
There's a fully functional 20-band graphical EQ built into n-Track Studio. Each channel and group has one. Here's a great tutorial that should help you locate and use it (thanks, Elwood!). Note: Unlike a plug-in EQ which can be placed anyplace in a track's signal chain, the built-in channel EQ is locked into place (prior to all other effects).
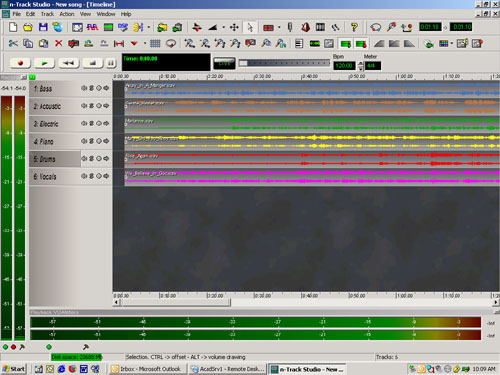
After you have done all your recordings and are ready for mixing, your Timeline should contain multiple tracks and look something like this:
EQ 1.1
There are two ways to open the channel EQ window:

EQ 1.2
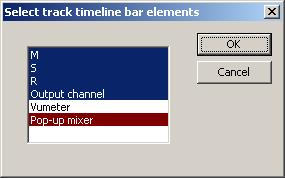
You'll find a Pop-up Channel Mixer for each track in the Timeline. Open an individual Channel Mixer by clicking on the arrow (see image, below left) to the left of the track. Can't find the arrow? It's probably hidden. To unhide it, right-click on any track name on the vertical Track Bar, and click "Select left track bar elements". The Select Track Timeline Bar Elements window will appear (see two images below):
![]()
EQ 1.3
EQ 1.4
Make sure that "Pop-up Mixer" is highlighted. You might also want to save your CPU some work by deselecting VU Meters. With the mixer open, locate the three round knobs in the middle of the Channel Mixer. They represent a typical channel strip EQ... (from left to right: low, mid, & high frequencies). Double-click any of them to open the EQ. Or, if you have VU Meters activated, there will be a little EQ icon next to the knobs which will activate the EQ window.
EQ 1.5
Click the Mixer button on N's main Toolbar

EQ 1.6
or press F3. The Mixer will open.
EQ 1.7
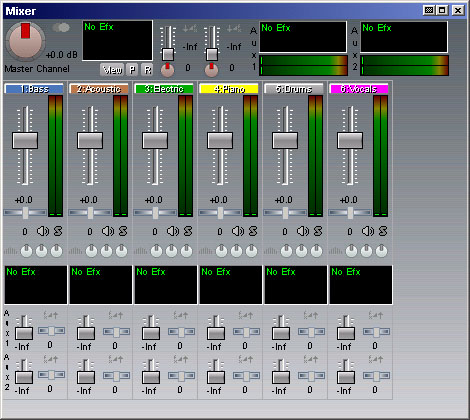
Not sure what are all these faders and buttons are for? Let's run through a short introduction to the basics. Here's a close up of a channel strip with each section labeled by number. This example happens to be track 5 and has been named "Drums". Each track in your song has an accompanying channel strip. Controls are explained below...

EQ 1.8
This may be a good time to discuss the difference between Channel Inserts and Auxilaries (AUX). To get an idea of how effects placed in an AUX differ from effects placed in a Channel Insert, let's go back to the hot water heater analogy.
Note: Each channel has an Aux Send. Aux Sends control how much of each channel is routed through the effects. There is also a master Aux Return which controls how much effected signal from ALL channels is added back to the Master Fader. A good way to look at this is to consider each channel's Aux Send as an adjustment for how much effect is added to each channel and the
Aux Return as a master adjustment of how much effect is added to the entire song.
After that short diversion, let's look at N's 20-band EQ.

EQ 1.9
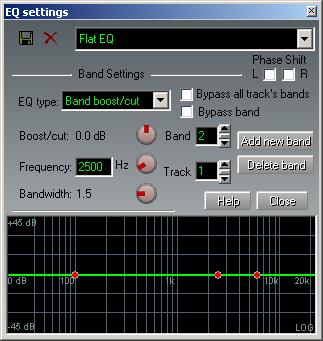
As you can see, n-Track's 20-band EQ is divided into several areas. The most important one is the big black graph with the green line. This is where you'll shape the sound of your track. By default, there are three red dots. Each dot represents a band of the EQ. Take a minute now to play around with the "Add New Band" and "Delete Band" buttons in order to understand them (add a band, and move it so it isn't covered by the next new band).
Find the "Phase Shift" check boxes. Clicking them shifts the phase of the track by 180°. If the track is a stereo track you can chose to reverse Left, Right, or both sides of the track. Use of Phase Shift is advanced and beyond the scope of this tutorial. The Bypass check boxes allow you to disable a particular band or the entire EQ. It is VERY helpful to alternately enable/disable your settings so you can hear what your EQ adjustments are doing to the track.
More on EQ Type later
Next, locate the boxes labeled "Band" and "Track". Use "Band" to activate a band before adjusting it. You can adjust the band's settings by clicking and dragging the knobs (which moves the dot), or clicking and dragging the dot (which moves the knobs). Use "Track" to recall and edit EQ settings for any track in the song.
So far so good, but there's lots more to learn. Click on the red band in the middle of the graph, and move it up & down and then left & right. Watch the knobs and parameters fields while doing so, and you'll learn several things.
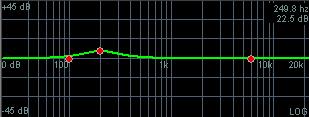
As a guide, there are some fixed values printed on the graph. Note that every octave doubles the frequency. For example, 440 is an A, and 880 is an A one octave higher. Let's start by boosting at 200Hz by 6db thus making it approximately twice as loud (Hint: In practice, it's generally musically better to cut than boost). There should now be a 'curve' centered at 200, and your graph should look something like this:
EQ 1.10
Be aware that the display of the EQ is logarithmic. If you look at the above graph closely, you'll see that the boost starts at approximately 66 Hz and ends at approximately 600 Hz. So the entire range being boosted is approx 3 octaves (66 200 is 1 ½ octaves, 200 600 is 1 ½ octaves).
So what happens if you want to affect a narrower or broader range? This is where Bandwidth comes into play. Experiment with the Bandwidth knob, and note how it affects the width of the curve. A value of '1' will affect two octaves. One left of the set frequency and one right of it. A value of '.5' will affect one octave.
Note: N handles bandwidth differently than other programs. Most study of bandwidth will mention something called 'Q'. It's helpful to understand the theory, but not neccessary to operate N effectively. We rather like the more simplified method employed within N.
Ok, let's talk about EQ Type:
Select Band 1, and look at the EQ Type list. Click on the arrow to expand the drop-down list, and study the options.
EQ 1.11
Select a band, change it to "High Pass", and experiment by dragging the band left and right. You'll see how the frequencies to the right of the band remain unaffected while the frequencies to the left of the band are drastically cut to zero. Try Low Pass in the same way.
Change the band to High Shelve and experiment by dragging the band up and down. You'll see how the frequencies to the right of the band remain unaffected while the frequencies to the left of the band are cut or boosted based on how high or low the band is set. Try Low Shelve in the same way. Notice how the shape of the red line forms a shelf.
Lastly, change the band to 'Band Boost/Cut, experiment by dragging the band left/right and up/down, and watch the shape of the red line. Remember that the width of the curve' is determined by the Bandwidth.
Ok, so we've covered EQ Types. But there's more to N's EQ; it comes with a free tuner and spectrum analyzer. Right-click to enable/disable either or both. The spectrum analyzer is great for comparing your EQ settings with known good tracks. Use it to learn about EQ, but ultimately, trust your ears!
The last area to explore is the top-most area of the EQ window. EQ settings can be saved for future use. Click the disk icon to start the process. Click the X to erase the current preset.
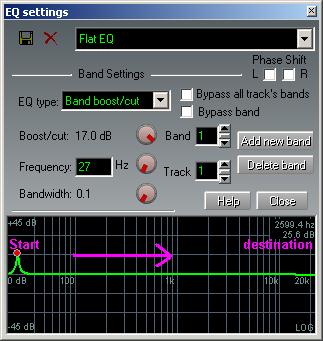
Here's a proven method of identifying which frequencies to cut:
EQ 1.12