
Dieser Artikel in deutsch.
Welcome to the third installment of our physics series, this time live from Sissi on the Island of Crete (in Greece). The last time, we learned about one of the most important elements of accoustics; the speed of sound. We also learned how to use it in real-life recording situations.
I hope you played around with the numbers and made yourself familar with them, because this time we'll dig into that knowledge and install some speakers for a gig. But before we do that, we should tune the guitars.
Approaching the stage, we notice many guitars and many speakers. The reason for so many guitars is easy enough to figure out, but why are there so many speakers? By the end of this, you'll know what the engineer was thinking.
Tuning stringed instruments with your ears isn't as hard as it sounds. What happens when two sound sources are out of tune? Assuming the easiest case, both sources produces sine tones. The following figures show screenshots from a Windows application I wrote for demonstrating.
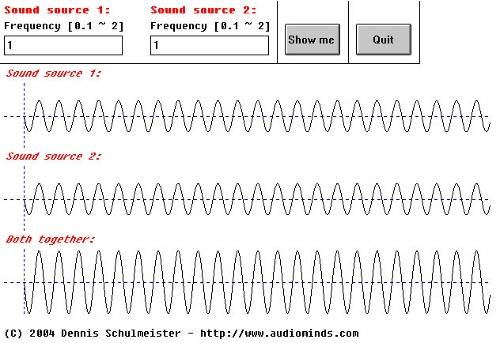
Accoustics 3.1
This figure shows two perfeclty in tune sound sources. We all know that sound is additive, so the resulting sound features an equal frequency but stronger amplitude.
What happens if the sources are out of tune? There are several cases to consider:
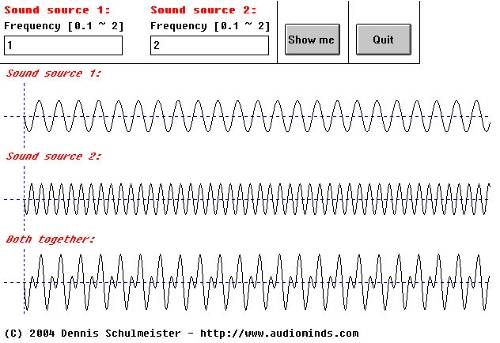
Accoustics 3.2
In this case something called "overtones" are created. You can calculate the overtones of any frequency this way:
fo = k * f ; k e N [Hz]
k e N (read: k element N) means that k is taken out of the natural numbers. Natural numbers are any numbers above zero without decimals. There's nothing else to be considered when dealing with overtones.
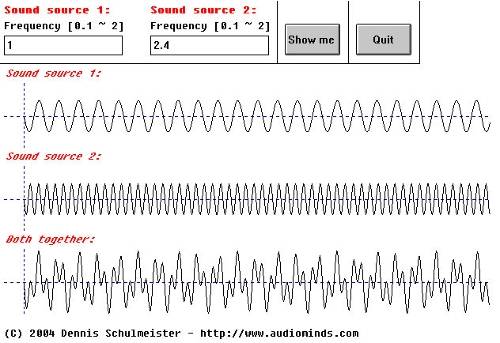
Accoustics 3.3
The plot looks totaly weird, but it is not hard to understand. The only things you can hear are two different tones, as long as the frequencies don't come too close together.
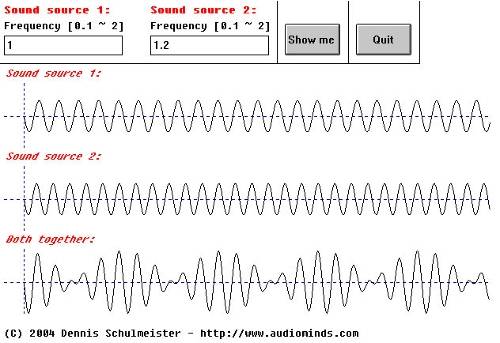
Accoustics 3.4
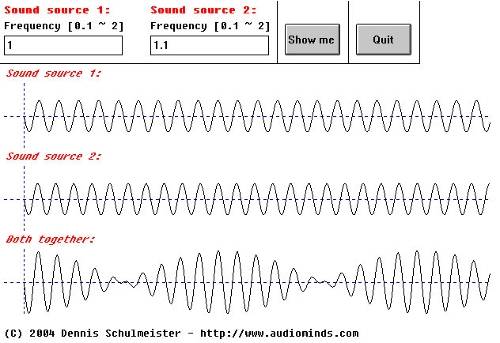
This is the most important case so far. The resulting sound will sound somewhat chorusy (chorus is still something else though. Chorus changes the frequency difference back and forth over time) which is often describbed as "floating sound".
While the plot still looks wired enough one can clearly detect the spots where the amplitude stays close to zero for a certain period. To detect this one needs a little bit of practice. After hearing it often enough, you'll recognize that the whole sound seems to get louder and quieter again and again.
Accoustics 3.5
This case is even more interessting. Now the nulls are easy to see and hear.The sound smoothly fades out and in. The closer the frequencies match the longer the fades take and the less often they occur.
Accoustics 3.6
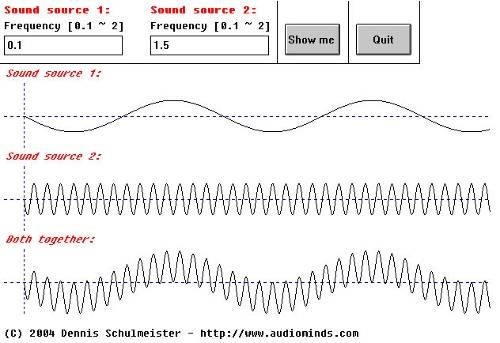
Ok, I admit this case doesn't have much to do with tuning instruments since not even all electronic synthesizers are capable of producing sounds as deep as 5 Hz, but serves as a great illustration. We see that the resulting wave is a perfect hybrid of both. It is almost impossible to hear this, but the oscilloscope reveals what is going on.
Given the information above, you should be well prepared and now know how to master the guitar collection on the stage. Unless you have perfect pitch, you'll need one external reference tone in order to tune the first string of the first guitar.
Perhaps you look over to the keyboards and remember how someone told you that an 'E' is the white key after the two black keys. You hit the key and simply try to match both instruments as close as possible (For practicing, it's ok to assume the first string is in tune and just go from there). While contemplating all the guitars, you remember the audiominds.com newsletter and the examples of possible out-of-tune-cases. The important one is when both frequencies get closer and closer.
When the first string is tuned, taking care of the rest is not too hard. Just play the note of a string on the next lower string (e.g. playing the 5th fret on the B string) and pluck both strings together. If their frequencies resemble anything like an interval, start adjusting the B string until they are close. When they start approaching the same frequency, start listening for the "beats" - the spots when the sound starts to fades out and in. The closer the frequencies get, the longer the fades take and the less often they occur.
If you've overshot your mark, they start to appear more often again. Process the other strings the same way. Similar techniques can be adapted for any other stringed instrument. (Tuning a piano is an art unto itself because of the "stretch tuning" involved, so you won't want to try tackling one based on this information!)
(A link to the software I wrote for creating the figures is provided below this article)
...
Ok - the guitars are tuned. Time for a break, because now the real hard work begins: setting up the speakers. (You really should set up the speakers first and then tune the guitars! --Ed. ) Before we start breaking our back, it would be best to use our brains to figure out where to put them. Some simple, easy to remember rules will help here:
Each accoustic source features a so-called nearfield and a farfield. For speakers, this is easy to understand.
Most cabinets use several individual speakers to reproduce different frequency ranges. The simplest ones may contain only one driver or might feature a bass speaker known as a "woofer" and a smaller high frequency only driver called a "tweeter". 3-way systems add an additional speaker for the high mid band.
An easy rule of thumb says that the border between nearfield and farfield is as far away from the speaker cabinet as its height. So if it's 12 ft high, 7 ft long and 9 ft deep the farfield begins 12 ft away from it.
The difference between nearfield and farfield is that the listener always is closer to one cone than to any other in the nearfield. Depending on the position, the sound and frequency content always changes in the nearfield. In the farfield, the sound of all cones combines well enough for the sound to not change too much at different listening positions. In most live situations, this is a given for the vast majority of all speaker installations. For mic'ing an instrument it's good to know.
Mr. Haas had an interesting thought, which is today known as the Haas-theorem. Our brain locates a sound source by the direction from which it is first heard. If you listen to someone who's talking to you from the right side, you can hear him with both ears. But because the distance from the narrator to your left ear is greater than the distance to your right ear, it will take longer for the sound waves to reach your left ear than the right. So your brain thinks: "Hm, the sound reached the right ear first, so the sound source must be on the right side. The sound is also louder on the right side. No doubt the source is on the right. Wait, what was he talking about?".
If you like, you can do a little test with a friend or someone from your family. Have him or her sit between two speakers or put headphones on. All they need to do is to tell you from where the sound comes from. Take two identical signals, (like someone talking,) and hard-pan it left and right. Then make the left one louder but let the right one start a few ms in advance. Most people will say that the source is coming from the right.
Back to our gig and the pile of speakers: It's very important that the audience will always have the impression that the sound is coming from the stage. We also want to put at least one pair of speakers in the rear of the room in order to compensate for the bad accoustics. If the room is large, we could also put a pair of speakers in the middle of the room and so on.
To make things simple, (and because it's only a medium-sized room,) we install four pairs of speakers; one in front of the stage and one in the rear of the room. This is a nice installation because it allows for keeping the volume down and avoiding many problems like mic feedback, too many undesirable echos and angry listeners who can't stand the volume.
But we're not done yet. Everything is fine for the listeners in first half of the room who is nearer to the stage than to the rear. But everybody else will hear the sound from the rear speakers prior to the sound from the stage speakers. It's not a good sign if the drummer starts the greatest solo of his life and half of the audience turns their heads.
So we have to compensate for those time alignment differences. Even the most far away listener in the room must hear the sound from the stage prior to the sound from the rear speakers. What needs to be done is simple. Last month, we learned how to calculate the time it takes for the sound waves to travel a given distance.
Today we'll use those formulas in order to calculate how long it takes for the sound waves to reach the back of the room. Remember, the formulas read:
v = 331.4 + 0.6T [m/sec] with T being the room temperature in °C
t = d/v (time equals distance divided by speed)
Because most Americans are more familar with inchs, feet and Fahrenheit, here are the same formulas with Imperial units:
Inch -> cm: CM = IN / 2.54... [cm]
cm -> inch: IN = CM * 2.54... [in]
feet -> metre: M = FT * 0.3048... [m]
metre - > feet: FT = M / 0.3048... [ft]
If you want to be very accurate and have enough time, you can make very precise calculations using these formulas, but be adised to be on the lookout for "metric creep" if you convert to inches using the above constants.
I hope you didn't forget to tape that small paper on your console which reads:
346.4 m/sec = 1136.48 ft/sec
This is the avarage speed of sound in a room where the temperature is controlled for human comfort. For our purposes, those numbers and the formula
t = d/v
will do the trick. Let's say the room is 10 ft long. Then we would calculate:
t = 10 / 1136.48 = 0.008799... sec = 8 ms.
8 ms is the time it takes until the music to be heard everywhere in the room. Because of the Haas-effect, we have to introduce a delay of at least 8 ms to the rear speakers. But 8 ms wouldn't be a good delay time, because both the sound of the stage speakers and the sound of the rear speakers would be heard at the back of the room at the same time.
We want the sound from the stage to arrive slightly sooner, so we increase the delay to maybe 10 ms or even more. One has to consider that we're dealing with a simplified situation. In real-life, the speakers can be located way above the ears of the audience and so it would take different times for each speaker to reach listeners.
In that case, one could use the Pythagorian Theorem in order to calculate the hypothenuse of an orthogonal rectangle. (a² = b² + c² where a is the hypotenuse and b and c are the remaining legs.) The result of this calculation would be used for our t = d/v formula.
Unless there is good reason, though, it probably isn't worth the effort. Simply add a few ms to the delay and try it out until it sounds intelligible. Listen for the clarity of sibilants. That's still the best way to do any accoustic engineering, because your ears must be the final judge of the results.
No real guitars or speakers were harmed in the writing of this article. Download the wave form application here. The application is © 2004 Dennis Schulmeister / www.audiominds.com and freely distributable.
Yours,
Dennis